×
[PR]上記の広告は3ヶ月以上新規記事投稿のないブログに表示されています。新しい記事を書く事で広告が消えます。
Fedora10についていろいろ勉強しようと思うのですが、新たにマシンを用意しなくて良く、簡単にできる方法として、Microsoft Virtual PCにFedora10をインストールして勉強していこうと思います。
という事で今回は、Microsoft Virtual PCにFedora10をインストールをしたいと思います。
※インストール後の感想:やはりMicrosoft Virtual PC上でFedora10を動かすととても遅いです、まあお手軽勉強目的という事で我慢するしかないですね。
Fedora10は、以下からダウンロードできます。
fedoraproject.org/ja/get-fedora
今回は、インストールメディアの「i386 - インストール DVD」をダウンロードしました。
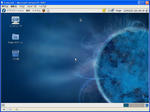
では、インストールを始めます、Microsoft Virtual PCの起動時にメニューバーから「CD」-「ISOイメージのキャプチャ」を選択し、ダウンロードしたFedora10を指定します。
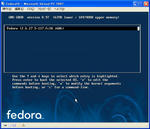
しばらくすると、Fedora10のセットアップが起動します。
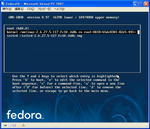
1.「TAB」キーを押下します。

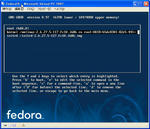
2.noreplace-paravirt vesa i8042.noloop clock=pit noapic nolapic vga=794 と入力し、「Enter」キーを押下します。

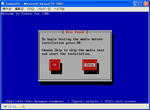
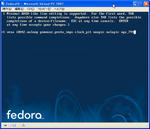
3.インストールメディアをチェックする場合は「OK」、チェックしない場合は「Skip」を押下します。
4.「Next」をクリックします。

5.「Japanese(日本語)」を選択し、「Next」をクリックします。
6.「Japanese」を選択し、「次」をクリックします。
7.「はい」をクリックします。
※ハードディスクの内容が初期化されるので注意!

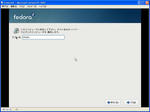
8.ホスト名を入力し、「次」をクリックします。
9.システムクロックでUTCを使用のチェックをはずし、「次」をクリックします。

10.ルートパスワードと確認を入力し、「次」をクリックします。

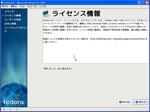
11.「次」をクリックします。

12.「変更をディスクに書き込む」を押下します。

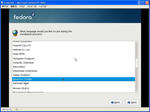
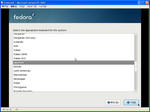
13.「次」をクリックします。
※今回はオフィスとプロダクティビティのチェック外しました。

インストールが実行され、完了後に再起動されます。
14.「進む」をクリックします。

15.「進む」をクリックします。
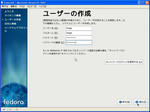
16.ユーザ名、フルネーム、パスワード、パスワードの確認を入力し、「進む」をクリックします。
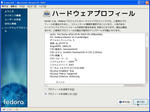
17.「進む」をクリックします。

18.「終了」をクリックします。
完了後に再起動されます。
起動時に「Shift」キーを押したままにします。
(Fedora10からgrubの起動画面は表示されなくなりました。表示する場合は、起動時に「Shift」キーを押したままにします。)
参考:docs.fedoraproject.org/release-notes/f10/ja/What_is_New_for_Installation_and_Live_Images.html
19.「e」キーを押下します。
20.kernel / ・・・を選択し、「e」キーを押下します。
21.noreplace-paravirt vesa i8042.noloop clock=pit noapic nolapic vga=794 と入力し、「Enter」キーを押下します。
22.「b」キーを押下します。
23.ログイン画面が表示されます。

24.このままだと、毎回起動時にgrubの設定を変更する必要があります。
viエディタ等を使って、grubの設定ファイル/etc/grub.confを変更します。
変更する部分は以下の赤い文字の部分です。
# grub.conf generated by anaconda
#
# Note that you do not have to rerun grub after making changes to this file
# NOTICE: You have a /boot partition. This means that
# all kernel and initrd paths are relative to /boot/, eg.
# root (hd0,0)
# kernel /vmlinuz-version ro root=/dev/VolGroup00/LogVol00
# initrd /initrd-version.img
#boot=/dev/sda
default=15
timeout=0
splashimage=(hd0,0)/grub/splash.xpm.gz
hiddenmenu
title Fedora (2.6.27.5-117.fc10.i686)
root (hd0,0)
kernel /vmlinuz-2.6.27.5-117.fc10.i686 ro root=UUID=65dc8301-82e5-441e-b6e6-a29c1040cf78 noapic rhgb quiet noreplace-paravirt vesa i8042.noloop psmouse.proto=imps vga=794
initrd /initrd-2.6.27.5-117.fc10.i686.img
これで、次回からは何もしなくてもちゃんと起動します。
という事で今回は、Microsoft Virtual PCにFedora10をインストールをしたいと思います。
※インストール後の感想:やはりMicrosoft Virtual PC上でFedora10を動かすととても遅いです、まあお手軽勉強目的という事で我慢するしかないですね。
Fedora10は、以下からダウンロードできます。
fedoraproject.org/ja/get-fedora
今回は、インストールメディアの「i386 - インストール DVD」をダウンロードしました。
では、インストールを始めます、Microsoft Virtual PCの起動時にメニューバーから「CD」-「ISOイメージのキャプチャ」を選択し、ダウンロードしたFedora10を指定します。
しばらくすると、Fedora10のセットアップが起動します。
1.「TAB」キーを押下します。
2.noreplace-paravirt vesa i8042.noloop clock=pit noapic nolapic vga=794 と入力し、「Enter」キーを押下します。
3.インストールメディアをチェックする場合は「OK」、チェックしない場合は「Skip」を押下します。
4.「Next」をクリックします。
5.「Japanese(日本語)」を選択し、「Next」をクリックします。
6.「Japanese」を選択し、「次」をクリックします。
7.「はい」をクリックします。
※ハードディスクの内容が初期化されるので注意!
8.ホスト名を入力し、「次」をクリックします。
9.システムクロックでUTCを使用のチェックをはずし、「次」をクリックします。
10.ルートパスワードと確認を入力し、「次」をクリックします。
11.「次」をクリックします。
12.「変更をディスクに書き込む」を押下します。
13.「次」をクリックします。
※今回はオフィスとプロダクティビティのチェック外しました。
インストールが実行され、完了後に再起動されます。
14.「進む」をクリックします。
15.「進む」をクリックします。
16.ユーザ名、フルネーム、パスワード、パスワードの確認を入力し、「進む」をクリックします。
17.「進む」をクリックします。
18.「終了」をクリックします。
完了後に再起動されます。
起動時に「Shift」キーを押したままにします。
(Fedora10からgrubの起動画面は表示されなくなりました。表示する場合は、起動時に「Shift」キーを押したままにします。)
参考:docs.fedoraproject.org/release-notes/f10/ja/What_is_New_for_Installation_and_Live_Images.html
19.「e」キーを押下します。
20.kernel / ・・・を選択し、「e」キーを押下します。
21.noreplace-paravirt vesa i8042.noloop clock=pit noapic nolapic vga=794 と入力し、「Enter」キーを押下します。
22.「b」キーを押下します。
23.ログイン画面が表示されます。
24.このままだと、毎回起動時にgrubの設定を変更する必要があります。
viエディタ等を使って、grubの設定ファイル/etc/grub.confを変更します。
変更する部分は以下の赤い文字の部分です。
# grub.conf generated by anaconda
#
# Note that you do not have to rerun grub after making changes to this file
# NOTICE: You have a /boot partition. This means that
# all kernel and initrd paths are relative to /boot/, eg.
# root (hd0,0)
# kernel /vmlinuz-version ro root=/dev/VolGroup00/LogVol00
# initrd /initrd-version.img
#boot=/dev/sda
default=15
timeout=0
splashimage=(hd0,0)/grub/splash.xpm.gz
hiddenmenu
title Fedora (2.6.27.5-117.fc10.i686)
root (hd0,0)
kernel /vmlinuz-2.6.27.5-117.fc10.i686 ro root=UUID=65dc8301-82e5-441e-b6e6-a29c1040cf78 noapic rhgb quiet noreplace-paravirt vesa i8042.noloop psmouse.proto=imps vga=794
initrd /initrd-2.6.27.5-117.fc10.i686.img
これで、次回からは何もしなくてもちゃんと起動します。
 [0回]
[0回]
PR
コメント